
[ad_1]
I’ve a Christmas confession to make—I’ve by no means had a tree skirt earlier than. I don’t imply I’ve by no means made a tree skirt, I imply I’ve by no means had one usually.
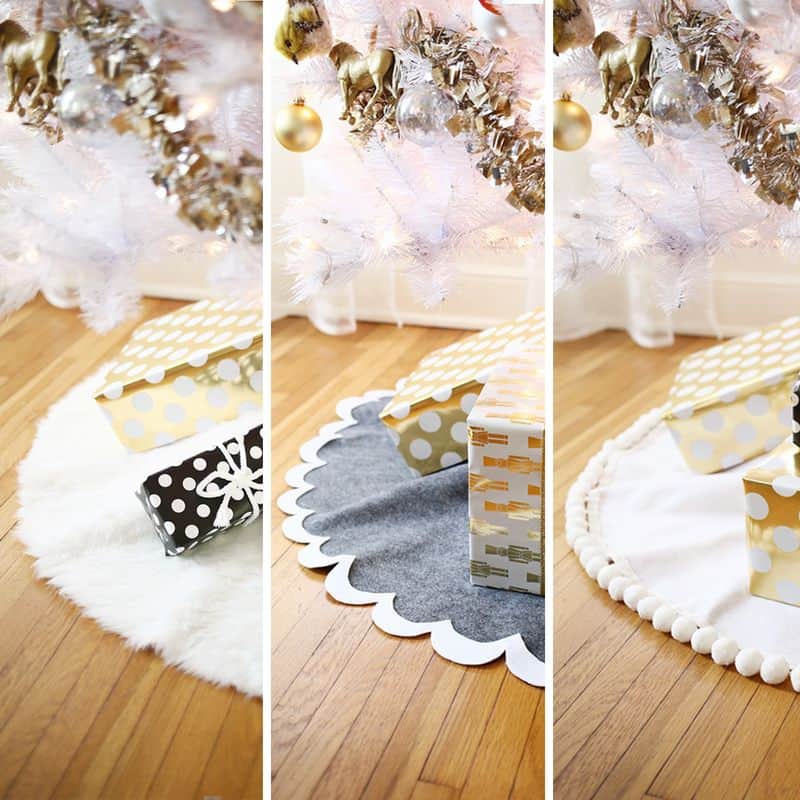
This 12 months, I believed I’d leap on the tree skirt prepare and begin with three simple no-sew choices for my first 12 months.
The excellent news is that these tree skirts actually are really easy to make, however the dangerous information is that (until you may have three bushes) you need to decide only one!
Associated: No-Sew Glitter Star Tree Skirt DIY
")
-fabric (felt or fake fur in our case)
–sizzling glue gun
-matching ribbon
–cloth scissors
-ruler and marker
OK, listed here are the general instructions on your tree skirt. I’ll provide the variation particulars for every particular one under.
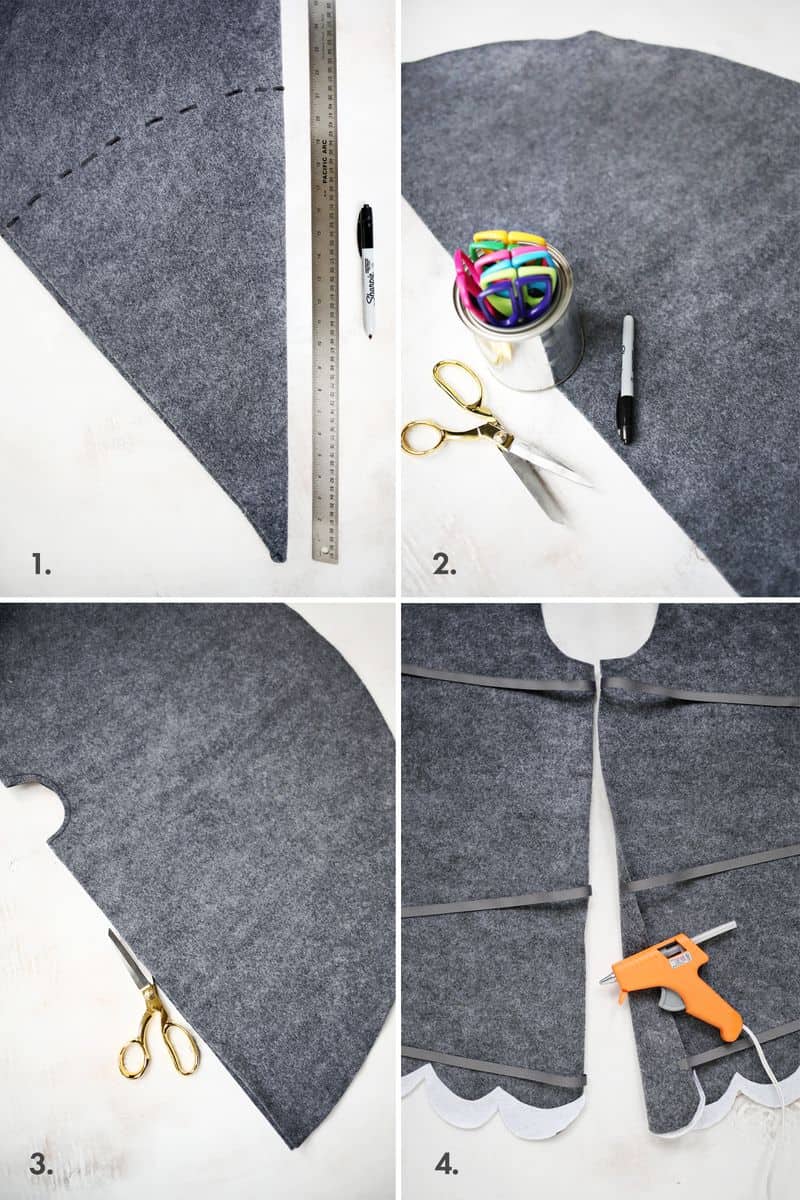
Step 1: First, we’re going to minimize a giant circle out of our cloth. A simple technique to get a good circle is to make a giant sq. that’s at the very least the width of your tree skirt (I’ve a small tree so I wanted at the very least 40″ vast).
Fold the sq. in half to make an extended rectangle (20″ x 40″), fold that rectangle in half on the center vertical line (20″ x 20″).
When utilizing skinny fabric-like felt, you’ll be able to even make one other fold to make your sq. a triangle like I did within the first image (the fur is just a little too thick to do this many folds).
Regardless of what number of occasions you fold your cloth, simply use a ruler and measure out half your circle diameter (so 20″ for me) from the middle of your folded sq. all the way in which throughout your folded cloth.
Reduce via the layers throughout the marked line with cloth scissors, and it is best to have a circle whenever you unfold it.
Step 2: To make the small center circle on your tree trunk, fold your cloth circle in half and place a spherical can or jar midway throughout the center level of your fold. Hint the half circle and minimize with cloth scissors.
Step 3: Depart the material folded and minimize the fold open on simply one of many sides. This opening will let you place your skirt over the bottom of the tree.
Step 4: To make the small ties that may hold your skirt closed as soon as it’s on the tree base, minimize 6 items of 6″ ribbon. Use a sizzling glue gun to attach them to the underside of your skirt in units of two.
These are the fundamental directions. Let’s get to the main points!
")
The best way to Make a Pom Pom Tree Skirt:
For the pom pom skirt, all you need to do is observe the fundamental instructions after which sizzling glue pom pom trim across the fringe of the skirt. I really like jumbo pom poms, so I purchased the most important trim I might discover on the native craft retailer.
")
")
")
The best way to Make a Scalloped Tree Skirt:
To make a scalloped edge skirt, hint the underside half of a spherical merchandise (like a ribbon spool) all the way in which across the fringe of the skirt as soon as you chop your massive circle.
I believed it will be enjoyable so as to add a white tip to the sting of the scallops to make it appear to be little snow banks. So, as soon as all of the gray scallops had been minimize, I traced the sting onto some white felt as effectively.
After reducing the white scallops, I used cloth glue (though the recent glue gun would work, too) to safe the snow ideas onto the gray.
")
")
")
The best way to Make a Fake Fur Tree Skirt:
The fur skirt is the simplest one as a result of you may have the least quantity of issues so as to add to it, however you need to be just a little slower when reducing out your circles to maintain the size of the fur intact across the edges.
I used the folding technique (in step 1) to mark my reducing path, however I didn’t minimize all of the layers directly like I did with the felt.
I saved flipping and refolding the fur so I might mark all the way in which across the circle, after which solely minimize one layer deep making very small cuts as I went.
Tip: Attempt to hold the underside blade of your scissors scraping as near the backing of the fur as attainable and that may even hold you from chopping the ends of your fur brief.
After you make all of your cuts into the fur, take it outdoors and provides it a very good shake so it gained’t shed any extra fur bits later.
")
")
Elsie’s tree agreed to mannequin the skirts for our photos (we love a white Christmas tree over right here with some fairly garland).
We’ve additionally bought a ton of Christmas content material in our archives, so flick thru there for extra vacation tasks and recipes! xo, Laura
Love this publish? Join our publication for extra inspiration!

Get inventive concepts for recipes, crafts, decor, and extra in your inbox!

Get the How-To
3 fast methods to make a tree skirt (no-sew!)
Directions
-
First, we’re going to minimize a giant circle out of our cloth. A simple technique to get a good circle is to make a giant sq. that’s at the very least the width of your tree skirt (I’ve a small tree so I wanted at the very least 40″ vast).
-
Fold the sq. in half to make an extended rectangle (20″ x 40″), fold that rectangle in half on the center vertical line (20″ x 20″).
-
When utilizing skinny fabric-like felt, you’ll be able to even make one other fold to make your sq. a triangle like I did within the first image (the fur is just a little too thick to do this many folds).
-
Regardless of what number of occasions you fold your cloth, simply use a ruler and measure out half your circle diameter (so 20″ for me) from the middle of your folded sq. all the way in which throughout your folded cloth.
-
Reduce via the layers throughout the marked line with cloth scissors, and it is best to have a circle whenever you unfold it.
-
To make the small center circle on your tree trunk, fold your cloth circle in half and place a spherical can or jar midway throughout the center level of your fold. Hint the half circle and minimize with cloth scissors.
-
Depart the material folded and minimize the fold open on simply one of many sides. This opening will let you place your skirt over the bottom of the tree.
-
To make the small ties that may hold your skirt closed as soon as it’s on the tree base, minimize 6 items of 6″ ribbon. Use a sizzling glue gun to attach them to the underside of your skirt in units of two.
Pom Pom Tree Skirt:
-
For the pom pom skirt, all you need to do is observe the fundamental instructions after which sizzling glue pom pom trim across the fringe of the skirt. I really like jumbo pom poms, so I purchased the most important trim I might discover on the native craft retailer.
Scalloped Tree Skirt:
-
To make a scalloped edge skirt, hint the underside half of a spherical merchandise (like a ribbon spool) all the way in which across the fringe of the skirt as soon as you chop your massive circle.
-
After reducing the white scallops, I used cloth glue (though the recent glue gun would work, too) to safe the snow ideas onto the gray.
Fake Fur Tree Skirt:
-
The fur skirt is the simplest one as a result of you may have the least quantity of issues so as to add to it, however you need to be just a little slower when reducing out your circles to maintain the size of the fur intact across the edges.
-
I used the folding technique (in step 1) to mark my reducing path, however I didn’t minimize all of the layers directly like I did with the felt.
-
I saved flipping and refolding the fur so I might mark all the way in which across the circle, after which solely minimize one layer deep making very small cuts as I went.
-
Tip: Attempt to hold the underside blade of your scissors scraping as near the backing of the fur as attainable and that may even hold you from chopping the ends of your fur brief.
[ad_2]